1Z0-1104-25 Exam Questions & Answers
Oracle Cloud Infrastructure 2025 Security Professional • Oracle
100% money-back guarantee
Sample 1Z0-1104-25 Questions
Practice with real exam-style questions, each with the verified correct answer and explanation.
"You are designing a secure access strategy for compute instances deployed within a private subnet of an OCI Virtual Cloud Network (VCN). Your security policy requires that no compute instances in the private subnet should have direct Internet access, and administrative access should be controlled.
Which statement best describes the role of an OCI Bastion in securing access to these private compute instances?
In Oracle Cloud Infrastructure (OCI), bare metal instances provide customers with direct access to the underlying hardware. To mitigate security risks when a customer terminates a bare metal instance, OCI utilizes Root-of-Trust hardware.
What is the primary function of the Root-of-Trust hardware in this context?
SIMULATION
Task 6: Create Load Balancer and Attach Certificate
Create a Load Balancer with the name PBT-CERT-LB-01 in subnet LB-Subnet-PBT-CERT-SNET-02
Create a Listener for the load balancer, where:
Name: PBT-CERT-LB_LTSN_01
Protocol: HTTPS
Port: 443
Attach the certificate PBT-CERT-01-
Attach the security list PBT-CERT-LB-SL-01 to subnet LB-Subnet-PBT-CERT-SNET-02
Task 6: Create Load Balancer and Attach Certificate
Step 1: Create the Load Balancer
Log in to the OCI Console.
Navigate to Networking > Load Balancers.
Click Create Load Balancer.
Enter the following details:
Name: PBT-CERT-LB-01
Compartment: Select your assigned compartment.
Load Balancer Type: Select Public.
Virtual Cloud Network: Select PBT-CERT-VCN-01.
Subnet: Select LB-Subnet-PBT-CERT-SNET-02.
Shape: Choose a shape (e.g., 10 Mbps, adjust based on needs).
Click Next.
Leave backend sets and listeners as default for now (we'll configure the listener next).
Click Create Load Balancer and wait for it to be provisioned.
Step 2: Create a Listener
Once the load balancer is created, go to the Load Balancers page and click on PBT-CERT-LB-01.
Under Resources, click Listeners.
Click Create Listener.
Enter the following details:
Name: PBT-CERT-LB_LTSN_01
Protocol: Select HTTPS.
Port: Enter 443.
Certificate: Click Add Certificate, then select the PBT-CERT-01<username> certificate (e.g., PBT-CERT-0199008677labuser01) created in Task 5.
Leave other settings (e.g., SSL handling) as default unless specified.
Click Create.
Step 3: Configure the Backend Set
In the PBT-CERT-LB-01 details page, under Resources, click Backend Sets.
Click Create Backend Set (if not already created).
Enter basic details (e.g., name like PBT-CERT-BS-01).
Add a backend server:
IP Address: Use the private IP of PBT-CERT-VM-01 (find this in the instance details under Compute > Instances).
Port: 80 (HTTP, as configured on the web server).
Protocol: HTTP.
Click Create.
Step 4: Attach the Security List to the Subnet
Navigate to Networking > Virtual Cloud Networks.
Select PBT-CERT-VCN-01 and click Subnets.
Click on LB-Subnet-PBT-CERT-SNET-02.
Under Security Lists, ensure PBT-CERT-LB-SL-01 is attached. If not:
Click Edit.
Remove the default security list and add PBT-CERT-LB-SL-01.
Click Save Changes.
Step 5: Verify the Configuration
Ensure the load balancer health status is OK (check under Backend Sets > Health).
Test by accessing https://<load-balancer-public-ip> in a browser (replace with the public IP from the load balancer details).
You have created a compartment TEST in your subscribed tenancy. Then, you created two groups, test1 and test2, and want the users in these groups to be able to manage all the resources in the TEST compartment.
Which policy would you use to achieve this?
SIMULATION
Challenge 2 -Task 1
In deploying a new application, a cloud customer needs to reflect different security postures. If a security zone is enabled with the Maximum Security Zone recipe, the customer will be unable to create or update a resource in the security zone if the action violates the attached Maximum Security Zone policy.
As an application requirement, the customer requires a compute instance in the public subnet. You therefore, need to configure Custom Security Zones that allow the creation of compute instances in the public subnet.
Review the architecture diagram, which outlines the resoures you'll need to address the requirement:
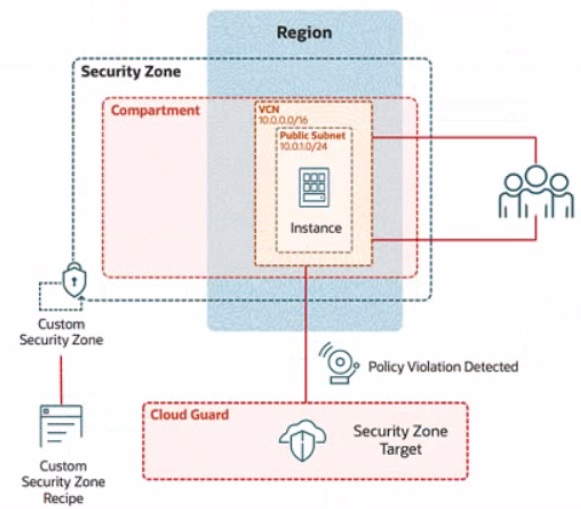
Preconfigured
To complete this requirement, you are provided with the following:
Access to an OCI tenancy, an assigned compartment, and OCI credentials
Required IAM policies
Task 2: Create a Security Zone
Create a security Zone named IAD_SAP-PBT-CSZ-01 in your assigned compartement and associate it with the Custom Security Zone Recipe (IAD-SAP-PBT-CSP-01) created in the previous task.
Enter the OCID of the created Security zone in the box below.

To create a Security Zone named IAD_SAP-PBT-CSZ-01 in your assigned compartment and associate it with the Custom Security Zone Recipe IAD-SP-PBT-CSP-01 created in the previous task, follow these steps based on the Oracle Cloud Infrastructure (OCI) Security Zones documentation.
Step-by-Step Solution for Task 2: Create a Security Zone
Log in to the OCI Console:
Ensure you have access to the assigned compartment.
Navigate to Security Zones:
From the OCI Console, click the navigation menu (hamburger icon) on the top left.
Under Governance and Administration, select Security Zones.
Create a New Security Zone:
In the Security Zones dashboard, click the Create Security Zone button.
Configure the Security Zone Details:
Name: Enter IAD_SAP-PBT-CSZ-01.
Compartment: Select the assigned compartment provided.
Description: (Optional) Add a description, e.g., 'Security Zone for public subnet compute instances.'
Associate the Custom Security Zone Recipe:
In the Recipe section, select the custom recipe IAD-SP-PBT-CSP-01 created in Task 1 from the dropdown list.
Ensure the recipe is correctly associated to enforce the policy allowing compute instances in the public subnet.
Define the Security Zone Scope:
Under Resources to Protect, select the compartment or specific resources (e.g., the VCN with CIDR 10.0.0.0/16 and public subnet 10.0.10.0/24) to apply the security zone.
Check the box to include all resources in the selected compartment if applicable.
Create the Security Zone:
Click Create to finalize the security zone creation.
Once created, note the OCID of the security zone from the security zone details page. The OCID will be a unique identifier starting with ocid1.securityzone.
Verify the Security Zone:
Go to the Security Zones tab and locate IAD_SAP-PBT-CSZ-01.
Confirm the associated recipe (IAD-SP-PBT-CSP-01) and the applied policies.
OCID of the Created Security Zone
The exact OCID will be generated upon creation (e.g., ocid1.securityzone.oc1..<unique_string>). Please enter the OCID displayed in the OCI Console after completing Step 7.
Get access to all 36 verified questions with detailed answers.
Unlock All 1Z0-1104-25 Questions